Sick-68 with Raspberry Pico
The Stuff
Tools
- Hakko FX888D Soldering Station (From Oritech)
- Clippers
- Tweezers
- Ender 3 V2 (3D printer)
- Hot Glue Gun
- Voltmeter
Consumables
- Heat Shrink
- Solder
- Silicon Wires (30 AWG)
- Masking Tape
- Super Glue
- Self Adhesive Rubber Damper
- Light Gold PLA Filament
- White PLA Filament
- Hot Glue
Keyboard Parts
- Outemu Switches Clicky Linear Tactile
- Diodes 1N4148
- GMK Merlin Keycaps (Ali Express)
- Costar Stabilizers
- Raspberry Pi Pico
- Flat Head Screws
- Micro USB Cable
3D Printed Parts
- Keyboard Case
- Remix to fit the Raspberry Pi Pico
The Make
Thingiverse Make: https://www.thingiverse.com/make:1027678
Printing the Keyboard Case
Joining the case with Dowels and Super Glue
Connecting the Diodes
2 out of 5 Rows Complete
Connecting the columns. I found it useful to weave the wires under the diodes.
Rows and Columns are done!
Each Row and Column needs to be connected to a I/O pin
I weaved the wires to the right hand side of the board
I also colour coded it according to this diagram by Wulfboy'
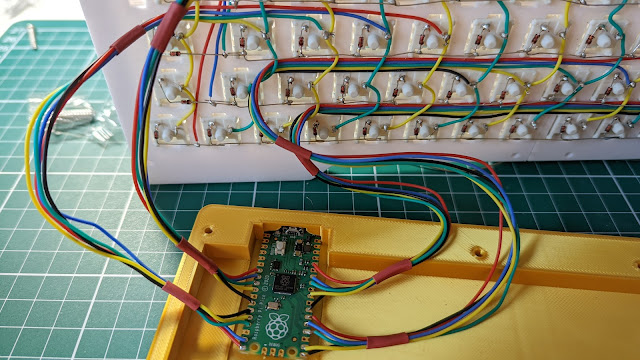
I removed the temporary masking tape and replaced it with Heat Shrink
Connecting it to the Raspberry Pi PICO
Hot Glue the Raspberry PICO to the Case
I forgot to take a picture but I put some hot glue on the I/O pins
Join the yellow and white parts together with flat head screws
The Keycaps look amazing!
The Code
Now we have to flash the Raspberry PICO with some software (older code ) newer code written by Wulfboy
- Download and Install CircuitPython (be sure to install the latest one)
- Download the remaining libraries from Libraries (circuitpython.org)
- After downloading the libraries, extract the zip, then copy the contents of adafruit-circuitpython-x.x-mpy-yyyymmdd/lib/adafruit_hid/ into your board at [Insert CIRCUITPYTHON directory here]/lib/adafruit_hid/.
- Then put the code written by Wulfboy at [Insert CIRCUITPYTHON directory here]/code.py
The Reflection
- Tweezers were very helpful when I was trying to put all the wires together.
- I was a total noob at soldering but my friend Jimmy taught me how to do it properly. Thank you!
- I used a Voltmeter to test the connections of the diodes as I put things together.
- There were over 200 tiny things to solder! I spread out the work over a few days
- I was not in a big rush to finish the project so I took my time and enjoyed the process!
- The switches are noisy but tasteful. It feels awesome!
- I am really happy with the end product. Highly recommended it for anyone who want to make use of their 3D printer and practice their soldering!


Comments
Post a Comment